
ChatGPT can now edit photos directly inside a chat window, and the only real tool you need is the right wording. Most people upload an image, type something vague like “make this look better,” and then wonder why the output missed what they actually wanted. The gap between a flat, off-target edit and a sharp, usable one almost always comes down to how the prompt is written, not the tool itself.
This guide walks through what these prompts actually are, how to phrase them so ChatGPT understands your intent, and a set of beginner-friendly prompts you can test right away. No padding, just wording that works in practice.
What Are ChatGPT Photo Editing Prompts?
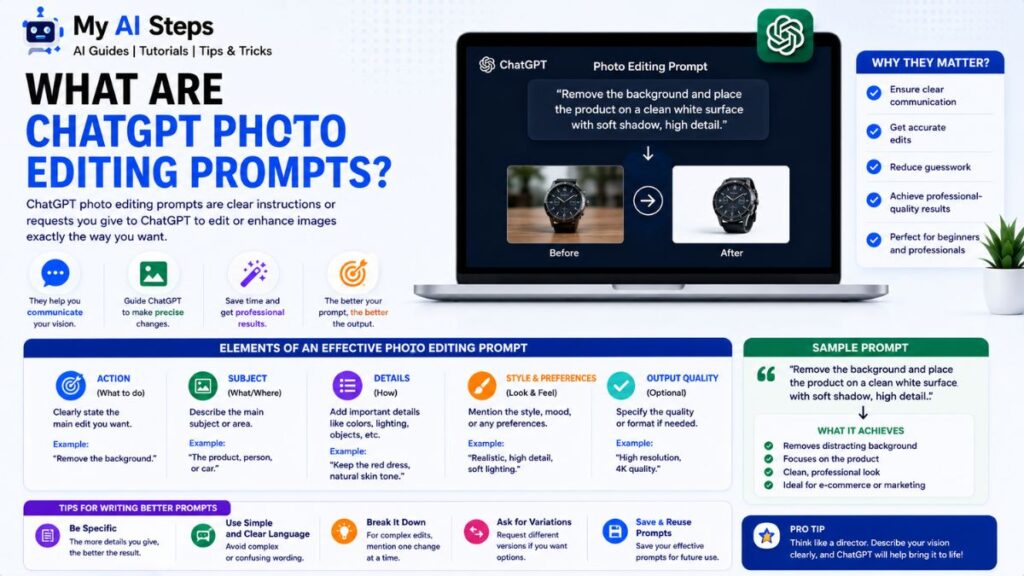
A ChatGPT photo editing prompt is the text instruction you type after uploading a picture, telling the model what to change, remove, add, or restyle. This runs through GPT-4o’s native image generation, which reads the photo and your written request as one combined input rather than processing them as two separate steps. That’s why specific wording matters so much here — the model is interpreting your description against the actual pixels in front of it.
A simple example: upload a photo of a kitchen, type “remove the microwave on the counter and keep everything else the same,” and the model edits that one element while leaving the rest of the scene intact. Compare that to typing “remove the microwave” with no other context — sometimes it works fine, but other times the model also shifts lighting or repositions nearby objects because it’s filling gaps in your instruction with guesses.
It helps to separate this from text-to-image generation, which builds a picture from scratch with no source photo involved. Photo editing prompts always start with an uploaded image and modify it, whether that’s swapping a background, adjusting color tone, removing an object, or converting a photo into a sketch or painting style. People use this for product photography touch-ups, casual headshot cleanup, restoring scanned family photos, and quick background swaps for social posts.
One thing beginners get wrong early on: they expect Photoshop-level pixel precision. ChatGPT interprets your intent and regenerates the affected area, so fine details — an exact shadow edge, a specific font on a sign, a precise color hex code — won’t always land perfectly on the first try. It’s closer to directing a skilled assistant than operating a manual tool, and that distinction shapes how you should write your prompts.
How to Write Effective Image Editing Prompts in ChatGPT
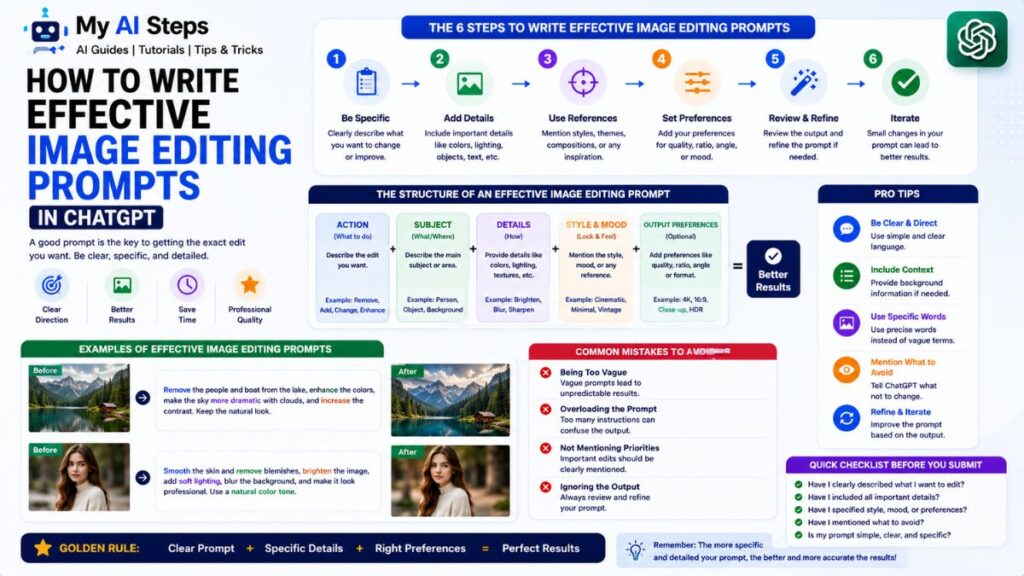
Specificity is the single biggest factor in getting a usable result. Vague prompts give the model room to interpret things however it wants, and that interpretation often isn’t what you pictured. “Make this photo pop” could mean brighter colors, higher contrast, sharper focus, or all three — the model has to guess, and guessing rarely matches what’s in your head.
A stronger structure is to state three things in your prompt: what stays the same, what changes, and any style or mood reference. For example, instead of “edit this photo to look professional,” try “keep the person’s pose and expression exactly as is, replace the cluttered background with a plain light gray studio backdrop, and adjust lighting to look soft and even.” That’s a longer prompt, but it removes most of the guesswork.
Stick to one or two changes per prompt rather than listing five edits at once. When you stack too many instructions together, ChatGPT tends to prioritize some and skip others, or blend them in ways you didn’t intend. It’s faster, in practice, to make one clean edit, check it, then layer the next change on top with a follow-up message.
Descriptive language around lighting, color temperature, and mood does more work than people expect. Words like “warm afternoon light,” “muted desaturated tones,” or “soft overcast lighting” give the model a clear visual target. And if the first result isn’t quite right, refining it through a follow-up prompt — “make the background slightly darker, keep everything else” — usually works better than starting over with a brand-new request.
Best ChatGPT Photo Editing Prompts for Beginners
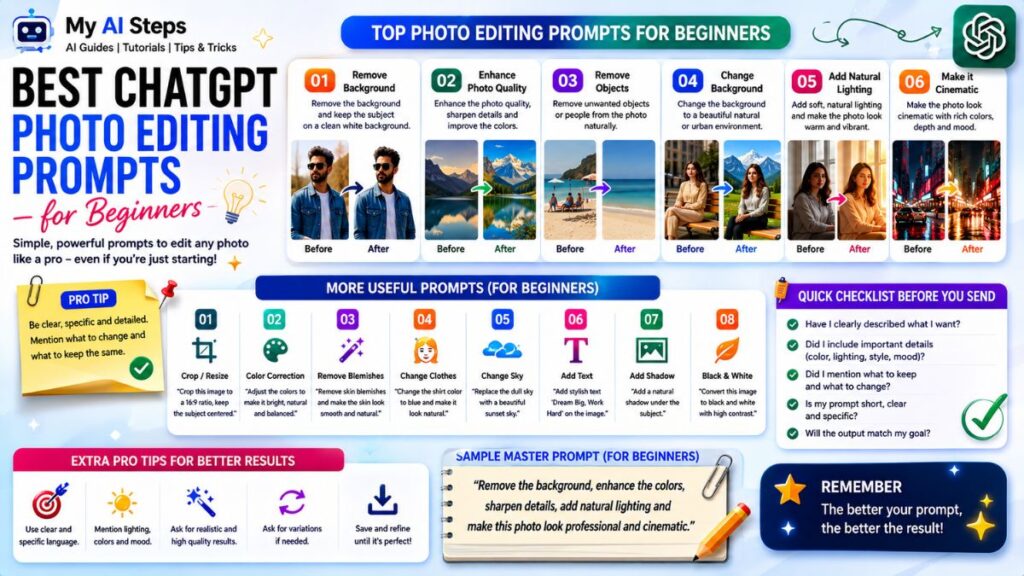
Here are practical, ready-to-use prompts organized by common edits people search for:
Background removal or replacement: “Remove the background completely and replace it with a plain white backdrop, keep the subject and lighting unchanged.”
Color and tone enhancement: “Increase the warmth slightly, boost contrast a little, and keep the colors looking natural rather than oversaturated.”
Object removal: “Remove the trash can in the bottom right corner and fill that area so it blends naturally with the rest of the scene.”
Old or damaged photo restoration: “Restore this old photo by reducing scratches and fading, keep the original facial details and expressions exactly as they are.”
Style conversion: “Turn this photo into a soft watercolor painting style while keeping the same composition and subject pose.”
Outfit or color changes: “Change the color of the shirt to navy blue, keep everything else in the photo exactly the same.”
Each of these works because it tells the model what to touch and what to leave alone — that pairing is what separates a usable beginner prompt from one that produces unpredictable results.
Advanced Prompt Techniques for Professional Photo Editing
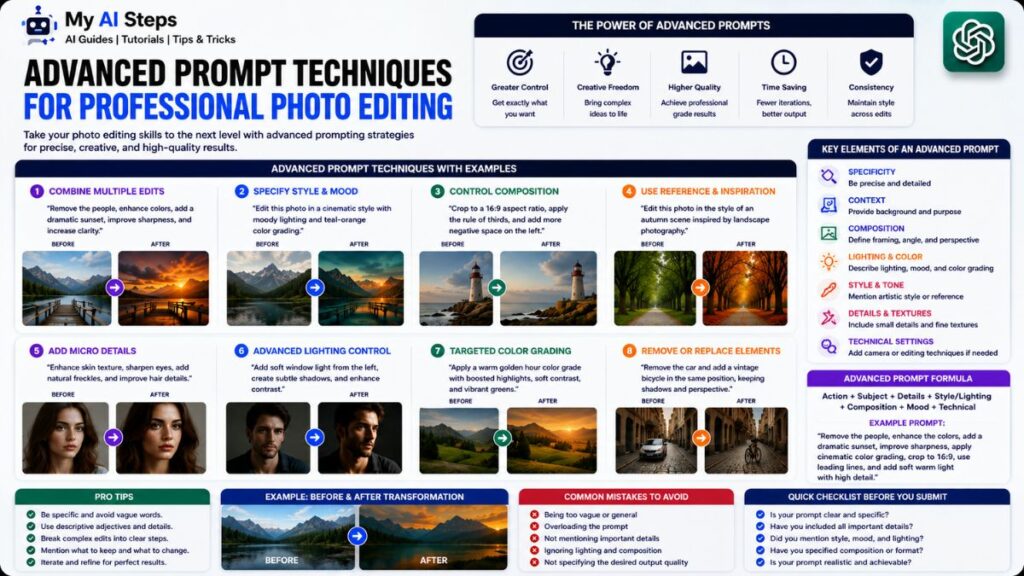
Once you’re comfortable with basic edits, layered prompting opens up a lot more control. This means breaking a complex edit into a sequence of smaller prompts instead of one giant instruction. A product photographer, for example, might first ask ChatGPT to clean up the background, then in a follow-up message adjust the shadow direction, then in a third message fine-tune the color grading. Each step builds on the last one, and the model handles sequential edits far better than it handles one massive request packed with ten changes.
Reference-based prompting is another technique worth using. Instead of describing a style in abstract terms, you can say something like “match the lighting style of a golden hour outdoor portrait” or “give this the look of a 1970s film photograph with slight grain.” Naming a recognizable photographic style — film noir, studio softbox lighting, cinematic color grading — gives the model a concrete target instead of an ambiguous adjective.
For professional use cases, it also helps to specify what should remain untouched, not just what should change. Saying “do not alter the subject’s facial features or skin texture” before requesting a background or lighting change reduces the chance of unwanted drift in areas you care about. This matters a lot for headshots, product catalogs, or any image where consistency across a batch is the goal.
A mistake I see often: people assume one perfect prompt exists for complex edits. In reality, professional results usually come from two or three rounds of refinement, not a single flawless instruction. Treating it as a back-and-forth conversation, rather than a one-shot command, gets noticeably better output.
Step-by-Step Guide to Editing Images Using ChatGPT

Start by uploading a clear, well-lit source image. Blurry or heavily compressed photos give the model less detail to work with, and that shows up in the final edit — soft edges, mismatched textures, or odd artifacts in the areas that got changed.
After uploading, write a single, focused instruction describing the change. Keep it specific: name the object, area, or attribute you want adjusted, and mention what should stay the same. This is the same principle covered earlier, but it matters even more once you’re working through multiple steps.
Review the output before asking for anything else. Check whether the edit actually addressed what you asked, and look closely at the areas surrounding the change — sometimes an edit to one part of the image subtly shifts lighting or color elsewhere.
If something’s off, send a follow-up prompt that targets only that issue. For example: “the shirt color looks too dark, make it a slightly brighter navy, keep everything else as is.” This is more reliable than rewriting your original prompt from scratch, since the model retains context from the current image state.
Repeat this cycle — edit, review, refine — until the result matches what you need. For most everyday edits, this takes two to three rounds. More detailed professional work, like compositing a person into a new scene, often takes four or five passes before the lighting and proportions feel consistent.
Save your final version once you’re satisfied. ChatGPT doesn’t automatically version your edits, so if you want to compare the original against the edited version later, download both rather than relying on chat history to hold onto them.
Portrait Photo Editing Prompts for High Quality Results
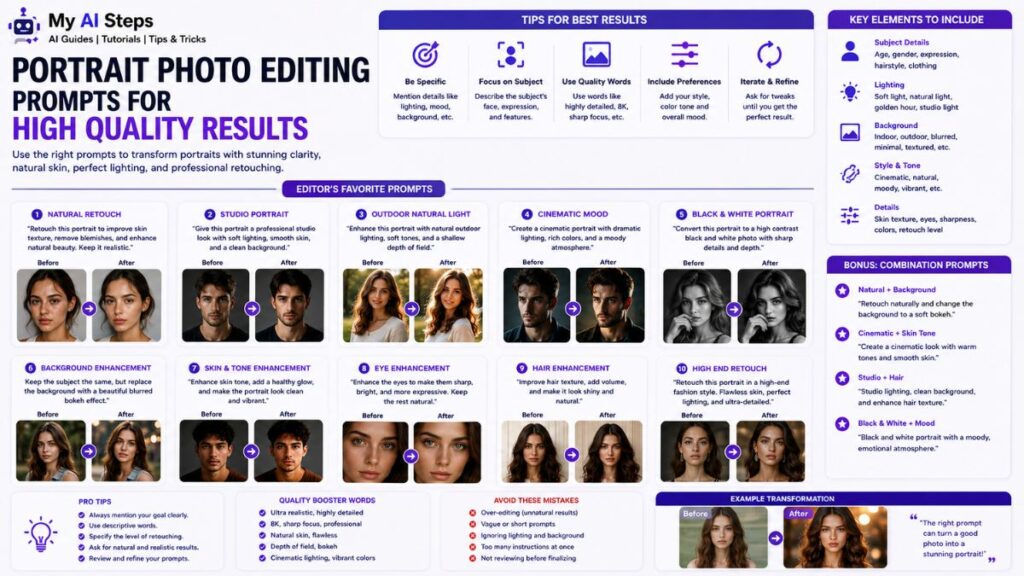
Portraits are one of the trickier categories because small changes to skin tone, lighting, or facial proportions are noticeable immediately. The goal with portrait prompts is usually to enhance, not transform — and the wording should reflect that.
For skin and lighting adjustments: “Smooth the skin slightly while keeping natural texture, soften harsh shadows under the eyes, do not change facial structure or proportions.” Adding “keep natural texture” matters here — without it, the model sometimes over-smooths skin into a plastic-looking finish, which is a common complaint with AI portrait edits.
For background and depth adjustments: “Blur the background softly to create a shallow depth of field effect, similar to a portrait lens, keep the subject in sharp focus.” This mimics the bokeh effect from a wide-aperture camera lens without needing actual photography equipment.
For color grading on portraits: “Apply a warm, soft color tone to the photo, slightly reduce harsh contrast, keep skin tones natural and not orange or overly warm.” That last clause matters — warm color grades can easily push skin tones into an unnatural orange tint if you don’t specify the limit.
For professional headshots specifically: “Adjust the lighting to look like even studio lighting, remove any harsh shadows on the face, keep the expression and pose unchanged.” This works well for converting a casually-lit photo into something closer to a professional headshot setup.
One practical tip from working with these prompts repeatedly: always mention “keep facial features unchanged” when editing portraits, even if it feels redundant. The model occasionally makes small unintended adjustments to eye shape, nose width, or jawline when processing other changes nearby, and that one line acts as a safeguard against it.
Background Removal and Replacement Prompts in ChatGPT
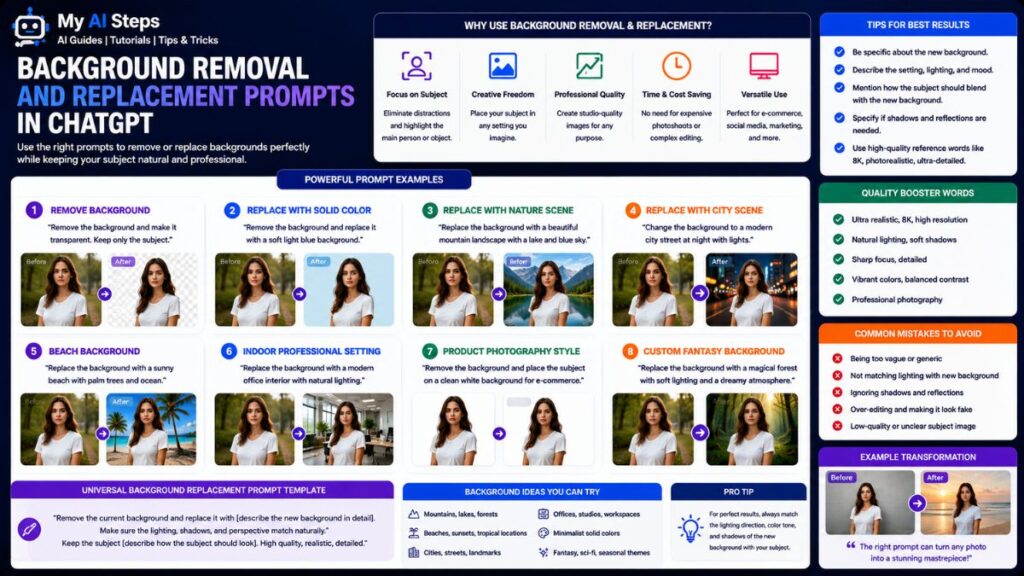
Background editing is one of the most common requests, and it splits into two distinct tasks: removing a background entirely, and replacing it with something new. Each needs slightly different wording.
For clean removal, useful for product listings or transparent-background needs: “Remove the background completely, keep only the subject, make the background plain white.” If you want a transparent-style result for further editing elsewhere, mention that directly, since ChatGPT will default to filling in a solid color or scene rather than true transparency.
For scene replacement: “Replace the background with a softly blurred outdoor park setting, keep the subject’s lighting and position exactly as they are.” Being specific about the new setting — indoor studio, outdoor nature, urban street, plain gradient — gives much more predictable results than a generic “change the background.”
A common beginner mistake here is forgetting to anchor the lighting. If your subject was photographed under indoor lighting and you ask for an outdoor background, the final image can look mismatched unless you add something like “adjust the lighting on the subject to match outdoor natural light.” Skipping that line is the main reason background swaps sometimes look obviously edited.
For e-commerce or catalog work, consistency across multiple images matters more than creativity. A prompt like “replace the background with a plain light gray studio backdrop, keep the product centered and lighting consistent with a softbox studio setup” works well when you’re processing several photos and need them to look like they belong in the same set.
If the edge detection isn’t clean — stray hairs, fabric edges, or transparent objects like glass often trip this up — a follow-up prompt focused only on that area usually fixes it faster than redoing the whole background request. Something like “clean up the edges around the hair, the background should not show through” targets the specific problem without disturbing the rest of the edit.
Social Media Photo Editing Prompts for Instagram and Facebook
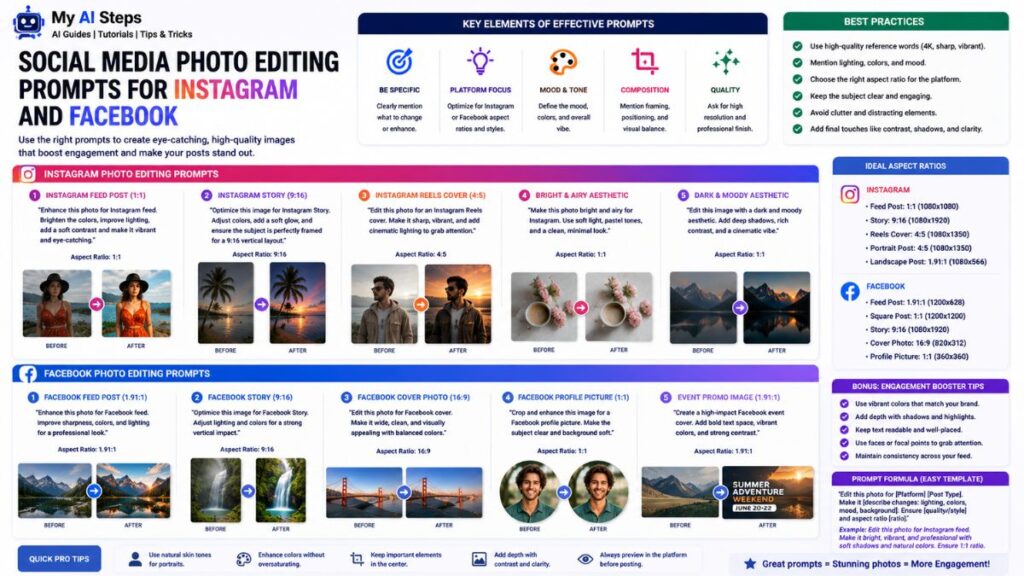
Social media photos have different needs than product shots or portraits. They need to grab attention in a fast-scrolling feed, which usually means brighter colors, tighter framing, and a style that fits whatever aesthetic you’re going for — minimal, vibrant, moody, whatever matches your page.
For a brighter, scroll-stopping feed photo: “Increase brightness slightly, boost color saturation a little, sharpen the details, keep the photo looking natural and not overly edited.” That last part matters because over-saturated photos tend to look fake on a phone screen, even if they seemed fine on a desktop preview.
For a consistent aesthetic across multiple posts: “Apply a warm, slightly muted color tone to match a cohesive Instagram grid style, keep the subject and composition unchanged.” This is useful if you’re trying to keep a feed looking like one connected set rather than a mix of random tones.
For Stories or Reels covers, square or vertical cropping often needs to be addressed directly: “Crop this image to a 4:5 vertical ratio, keep the subject centered, do not stretch or distort the image.” Mentioning the ratio matters — without it, the model may crop in a way that cuts off important parts of the photo.
For Facebook cover photos or banners, wider framing prompts work better: “Extend the background slightly on both sides to fit a wide banner format, keep the original subject and lighting unchanged.” This is the kind of prompt that often needs a second pass, since extending a background convincingly is one of the harder edits for the model to get exactly right on the first try.
Common Mistakes to Avoid in AI Photo Editing Prompts
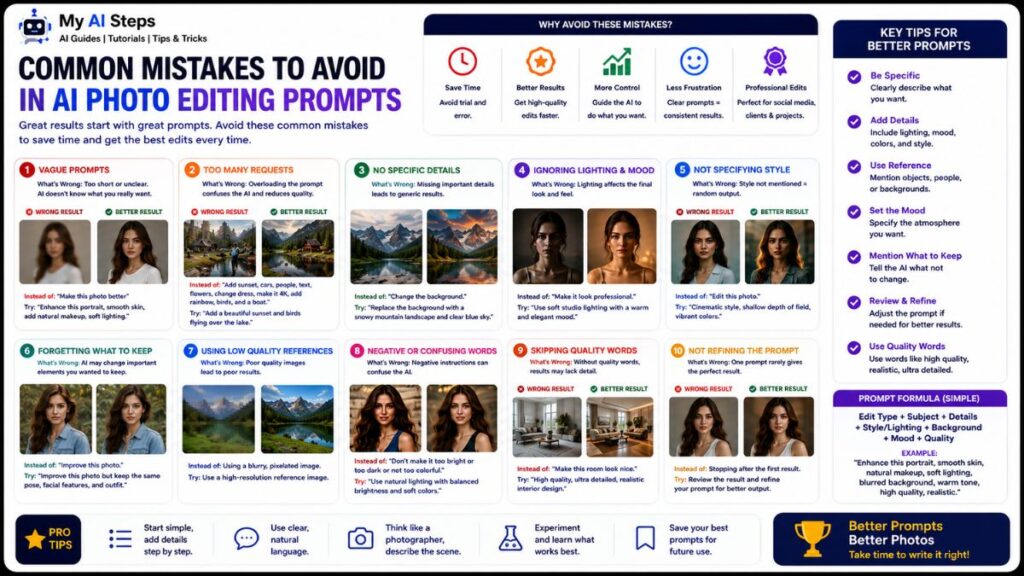
The most common mistake is vague language. Words like “better,” “nicer,” or “improve this” don’t give the model anything concrete to act on. It ends up guessing, and the guess rarely matches what you had in mind. Swapping vague words for specific ones — brighter, warmer, sharper edges, softer shadows — fixes most of this on its own.
Another mistake is stacking too many edits into one prompt. Asking ChatGPT to change the background, fix the lighting, smooth the skin, and crop the image all at once usually means at least one of those gets ignored or done poorly. Splitting requests into separate steps gives the model room to focus on each one properly.
People also forget to specify what should stay the same. If you only describe the change and never mention what to preserve, the model fills in the rest based on its own interpretation — which sometimes means it alters things you never intended to touch, like expression, pose, or unrelated background details.
Re-uploading the same photo repeatedly with completely different prompts, instead of working through a single ongoing edit, is another habit worth dropping. It breaks the model’s context and means you lose the benefit of incremental refinement, where each prompt builds on the last result instead of starting cold every time.
Lastly, expecting pixel-perfect precision on things like exact text, logos, or fine product details is a setup for disappointment. ChatGPT’s image editing is strong for general scene changes, lighting, color, and background work, but exact replication of small text or brand logos is still inconsistent. For that kind of precision work, a dedicated design tool is usually the better choice.
Tips to Get Ultra Realistic Edited Images Using ChatGPT
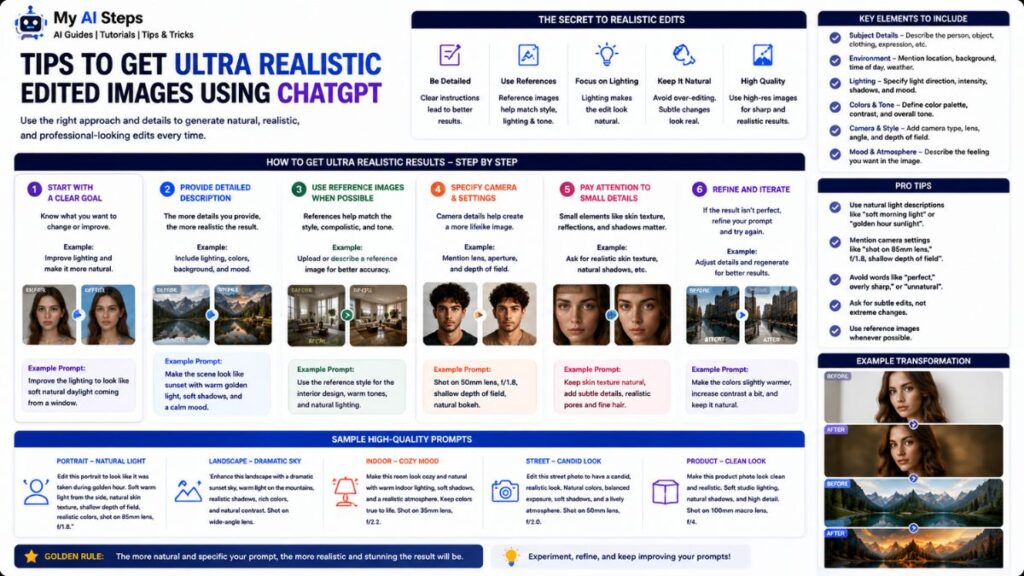
Realism comes down to consistency between the parts of the image that change and the parts that don’t. If you’re adjusting lighting on a subject, mention matching it to the rest of the scene. If you’re swapping a background, mention matching the shadow direction and color temperature to the subject. These small connecting details are what separate a believable edit from one that looks obviously pasted together.
Avoid over-specifying perfection. Prompts asking for “ultra HD, hyper-realistic, 8K detail” don’t actually push the model toward more realism — they often push it toward an overly sharp, slightly artificial look instead. Natural wording, like “keep the lighting soft and realistic, avoid an overly sharp or artificial look,” tends to produce more believable results.
Mention texture when it matters. Skin, fabric, wood grain, and natural surfaces all have texture that’s easy to accidentally smooth away during an edit. Adding “preserve natural texture and detail” to your prompt helps prevent that flattened, overly clean look that often gives AI edits away.
Work in small steps rather than asking for a dramatic transformation in one go. A photo edited gradually, with two or three light touches, almost always looks more natural than one pushed through a single heavy edit. This mirrors how real photo retouching works too — small adjustments stacked together, not one giant overhaul.
Finally, check the small details after every edit: hands, fingers, ears, and the edges where two textures meet are the areas most likely to show small inconsistencies. Catching these early and sending a targeted follow-up prompt is far more efficient than starting the whole edit over.
Getting good results from ChatGPT photo editing prompts text really comes down to treating it like a conversation rather than a single command. The more specific you are about what changes and what stays the same, the closer the output gets to what you actually pictured. Beginners who start with simple, focused prompts and build up from there tend to get usable results much faster than those trying to write one perfect instruction upfront.
None of this requires technical skill — it’s mostly about being clear and patient with the process. Once you get a feel for how the model responds to wording, editing photos this way becomes a quick, practical part of your workflow instead of a frustrating guessing game.
Frequently Asked Questions
Can ChatGPT edit photos I upload directly in the chat?
Yes, you can upload a photo and type instructions to edit it within the same conversation.
Why does ChatGPT sometimes change parts of my photo I didn’t ask about?
Vague prompts leave room for guessing, so mentioning what should stay unchanged helps prevent that.
Is ChatGPT good for editing small text or logos in images?
Not consistently, fine text and logo accuracy is still unreliable compared to dedicated design tools.
How many times can I refine the same image with follow-up prompts?
There’s no strict limit, most edits improve with two to four rounds of refinement.
Does ChatGPT support transparent background exports for product photos?
Not by default, you need to specifically request a transparent or solid plain background in your prompt.